Preface
This article is a partial-rebuttal/partial-confirmation to KGOnTech’s Apple Vision Pro’s Optics Blurrier & Lower Contrast than Meta Quest 3, prompted by RoadToVR’s Quest 3 Has Higher Effective Resolution, So Why Does Everyone Think Vision Pro Looks Best? which cites KGOnTech. I suppose it’s a bit late, but it’s taken me a while to really get a good intuition for how visionOS renders frames, because there is a metric shitton of nuance and it’s unfortunately very, very easy to make mistakes when trying to quantify things.
This post is divided into two parts: Variable Rasterization Rate (VRR) and how visionOS renders frames (including hard numbers for internal render resolutions and such), and a testbench demonstrating why photographing the visual clarity of Vision Pro (and probably future eye tracked headsets) may be more difficult than a DSLR pointed into the lenses (and how to detect the pitfalls if you try!)
I’d also like to briefly note, I am first and foremost an ARM64 simp, then a VR simp. Apple just happens to make the ARM64 VR headset with the best specs right now so it’s been fun to experiment with it, but I do also have a Quest 3.
tl;dr: See the bottom of the post for a tl;dr.
Part 1: An Apple VRR Primer
When everything is a memory bandwidth problem, Variable Rasterization Rate (VRR) is a great hammer
VR rendering is fundamentally a real-time task, and a lot of effort goes into ensuring that applications render at the display refresh rate. On the Meta Quest 3 and on PC, applications tend to manage timing expectations by lowering the render target resolution, often on-the-fly. On Vision Pro, both GPU compute and memory bandwidth is fundamentally controlled by the OS through VRR.
Variable rasterization rate rendering operates on the following key ideas:
Reducing the amount of fragments rastered, which reduces computation costs as well as the number of texture sampler reads. As a bonus, scene textures in low-rasterization-rate areas can also use mipmaps to avoid aliasing and further reduce sampling bandwidth. Reducing the number of render texture writes by letting the compositor handle blending later Reducing the number of render layer texture reads when the compositor unwarps the VRR texture
By contrast, techniques like variable rate shading only get the first benefit, but miss out on 2. and 3. above. And to clarify, an Apple VRR texture visibly compresses periphery detail in the texture itself—the center of the texture is always the fovea, or where the user is looking.
From https://developer.oculus.com/blog/how-does-oculus-link-work-the-architecture-pipeline-and-aadt-explained/. VRR operates on the same principle–the details of the dinosaur in the center are more important, so the texture physically has more space dedicated to the fovea.
On visionOS, every (on-screen) framebuffer is 1920x1824. The only exception to this rule is when capturing recordings with Reality Composer Pro, in which case the framebuffer textures become 3840x7360 (the width doubles, and the height quadruples). However, Apple has an additional ace up its sleeve with VRR: The rasterization rate map doesn’t have to cover the entire texture. Apple can dynamically adjust the resolution of every application in the OS on-the-fly, individually, without even swapping textures or viewports.
Notably, the Reality Composer Pro non-foveated captures don’t actually render at 40PPD, they actually render at an unfoveated 20PPD, and entire swathes of the 3840x7360 texture go completely unused.
(getting this info unfortunately requires extensive debugger shenanigans–best way to do it is `b CompositorNonUI`WBVRRUpdateRasterizationRateMapsHighResolution` and then messing with the struct in register X2).
At the OS level, this is handled with the following parameters, dictated to applications by wakeboardd (the visionOS layer manager): CompositorNonUI.framework receives a minimum PPD, a maximum PPD, two gaze angle vector2s (left/right eye), and an uncertainty vector2. These parameters are then constructed into a Rasterization Rate Map which defines how many pixels are dedicated to each segment of the physical viewport, with the full dimensions being determined by the maximum PPD and the confidence.
An approximation of a VRR framebuffer in texture space, and how it relates to foveation parameters sent by wakeboardd.
As an interesting side-note, the ability for MTLRasterizationRateMap to not encompass the entire texture size currently seems to be limited to private Apple-only APIs. It truly is a bit of an ace up Apple’s sleeve.
The two VRR modes of visionOS: FFR 26PPD and DFR 40PPD
visionOS has two modes it uses when rendering layers: Fixed Foveated Rendered (FFR) 26PPD [no eye tracking], and Dynamic Foveated Rendered (DFR) 40PPD [eye-tracked]. Most notably, applications rendering an Immersive Space with Apple’s designated Metal LayerRenderer are limited to the former, and cannot reach the full resolution of the headset. The only workaround to this is to use RealityKit, which does not have any such restrictions.
I recently added an experimental 40PPD mode to ALVR which severely abuses a combination of RealityKit, DrawableQueue and CADisplayLink in order to reach the maximum possible clarity for PCVR streaming by strapping head-anchored textured quad to the user, fed by off-screen Metal texture renderer. It works fairly well! Even if figuring out the precise head pose timing manually (using CADisplayLink’s vsync callbacks) was a bit of a pain. And unfortunately you also lose Apple’s compositor anti-nausea measures like spacewarp. But it works! And it enables some interesting mixed reality applications as well, since the alpha blending works.
Currently, Metal applications are given by wakeboardd a fixed foveation ranging from 5PPD to 26PPD, and a fixed gaze angle of 0x5 deg for each eye, with ±19.7deg uncertainty. So you’ve got about 40deg of 26PPD rasterization rate, and it tapers off down to 5PPD at the very edge. In theory, this is supposed to be the same PPD as the Quest 3, but in practice since the Quest 3 supersamples slightly (as they should) and renders a uniform 26PPD, the Vision Pro looks worse at “26PPD”.
For non-Metal applications*, applications are given a dynamic foveation ranging from 5PPD to 40PPD, and a gaze angle which follows the eye. By my estimations, the uncertainty is ±8deg, so about 16deg of 40PPD quality which quickly drops off.
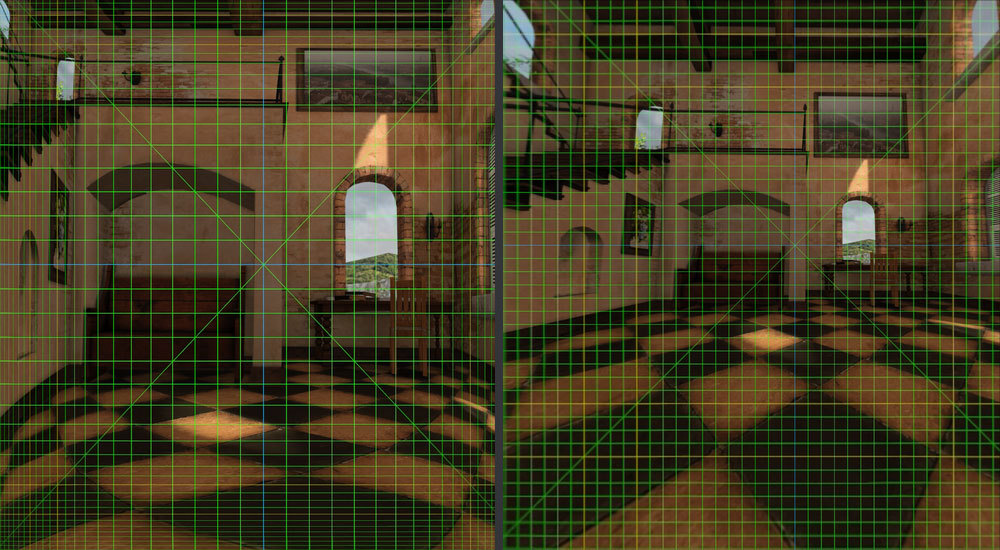
The two PPD modes as viewed in-headset. Note that these images are slightly cropped and not quite to-scale.
When rendering FFR 26PPD Metal applications, it should also be noted that VRR is not limited to only applications: The compositor also applies eye-tracked VRR when compositing all of the application layers into the final framebuffer. This has the benefit of reducing the number of texture sample reads slightly, if the gaze gets updated between the application’s render time and the compositor’s render time. The disadvantage is that layers are not mipmapped and may present aliasing artifacts after compositing. You can see this by rendering a black/white pixel grid in Metal: Despite being fixed-foveated, a small square will be visible where you are looking.
(If you can’t see it you might just have to take my word on it, but there’s a slightly darker spot floating around where I was looking)
As a final note before moving into the next section, since this will be pertinent later: Because every on-screen framebuffer is 1920x1824, this also means that another way to ~see what things would look like through the FFR 26PPD mode is by simply squinting your eyes so that the eye tracking is unavailable. If you have Pointer Control on, the eye tracking cursor becomes headlocked, and all content is rendered at FFR 26PPD.
Part 2: Building a benchmark tool for a post-eye-tracking world
Peering into Apple’s foveation with mipmaps
While attempting to shoehorn an off-screen Metal renderer into RealityKit, I discovered an interesting quirk with RealityKit’s DrawableQueue API (or rather, with VRR rendering in general). If you create and render a texture with mipmaps enabled, which mipmaps are selected for sampling depends on the rasterization rate of that portion of the view. Or in simpler terms, you can see exactly where your eye is looking.
With this in mind, I’d like to present my virtual monitor benchmarking tool I’ll be using: It is a simple RealityKit application which head-mounts a 28” virtual 1080p monitor, exactly 30” away from your view. And by uploading different colors to different mipmap levels, we can examine how much texture detail is being rendered to the displays for these exact viewing conditions, as well as investigate whether it’s possible for programmers to increase clarity.
In this test, I will be using KGOnTech’s 1080p white-on-black tuff test. All of KGOnTech’s patterns can be found on their website at https://kguttag.com/test/. I uploaded to the test pattern to the DrawableQueue MTLTexture under mipmap level 0, and the remaining mipmap levels are filled with a gradient from #FFFF00 (yellow) to #FF0000 (red). So any yellow rendered to the virtual 1080p screen comes from mipmap levels less than or equal to half the resolution of the 1080p test pattern (if the test pattern was present in all mipmap levels, like it would be in most applications).
From an initial glance, it’s notable that the texture has a hazy yellow hue right off the bat, indicating it’s doing some kind of blending from lower mipmap levels. While this may partially explain why it’s difficult to get clean, crisp lines on virtual displays displaying this test pattern, the real reveal is what happens when the eye tracking fails (for example, by squinting, blinking, or pointing a camera into the Vision Pro’s lenses):
It’s all mipmaps! More precisely, it’s all mipmap level 1, or half-resolution. This isn’t surprising at all–since every framebuffer in the OS is 1920x1824, fitting a 1080p display into a fixed foveation, without it lowering to mipmaps, would more-or-less require it to take up the entire field of view.
Even more importantly, however, we know for certain that the normal 40PPD rendering mostly doesn’t use mipmaps at all in the fovea (I’ll get to that ‘mostly’ in a moment). Outside of clarity losses from lens distortion, other post-processing, and aliasing from the quad being slightly askew, we should be seeing all of those pixels reaching our eye. But attempting to view it without an eye present automatically kneecaps the resolution by half. If you’re not careful, at least.
Oops, all mipmaps!
…So, which mipmap heatmap matches KGOnTech’s photos?
As much as I’d like to take a victory lap and make assumptions, I know better than to not check my work. At first glance, it does match up more with a dynamic foveation than a fixed one:
Tuff test with eye-tracked foveation. Yellow is mipmap level 1, amber is mipmap level 2. Of note, there is a yellow haze in the fovea, and 1.5 columns on both sides are completely covered in half-res/quarter-res mipmaps. I tried my best to focus on the ‘3’ in ‘34’ but it’s surprisingly difficult.
But looking closer, there does seem to be one odd discrepancy, which is that box 11 should be ~¼ res, and box 12 should be ~½ res. But in KGOnTech’s photos, box 12 and 13 look virtually identical:
Boxes 11-13 zoomed in. The leftmost column is very blurry, while the columns to the right are at least somewhat legible.
Compared against a fixed-foveated image, it does seem to slightly better match the boundaries, but I’m not entirely sure if I can confidently say that that level of blurriness (as seen in box 11) would be present, and that level of clarity seen in the other boxes would be present with only half the available resolution.
In this test, mipmap level 2 (¼ res) is designated by the color blue, which seems to seep into the edges prominently for the first and last column, and a blue haze is present over the entire image. Mipmap level 0 (full res) is not present.
I would personally guess that either the gaze confidence window was slightly wider due to the DSLR lens (which would imply a lower max PPD parameter), or the panel was slightly further than 30in from the lens view (which would imply more mipmap blending, maybe). However, we know some of the blurriness might not be optical–
Something I plan to investigate at a later time is to test whether the Quest 3, due to rendering to much larger framebuffers (or potentially, actually-supersampled framebuffers), simply has an accidental advantage in this test due to mipmap blending only kicking in at a slightly larger z distance. 1920x1824 is a pretty small framebuffer size, so it’s no wonder it’s pulling ½ res mipmaps so early on the Apple Vision. Needless to say, there might be non-optical shenanigans at play here, but I’m satisfied to know that KGOnTech likely did manage to get the eye tracking to follow a DSLR somehow. Maybe they use glint tracking or something.
Quantifying approximate effective monitor resolutions via mipmaps
One interesting thing that I think KGOnTech stumbled into (probably more intentionally than stumbling, really) is the fact that for a virtual 28” monitor 30 inches away, 1080p does genuinely seem to be right at the threshold of effective resolution on the Apple Vision Pro. For example, if I attempt to make a 28” 4k monitor, it doesn’t even try to sample at the highest texture size, it immediately drops to mipmap level 1:
The fovea is yellow, indicating the full-resolution 4K image was not sampled at all.
And if I do 1.5x 1080p (1620p?) it’s only barely using the full texture resolution and is already starting to blend lower resolution mipmaps into the fovea:
The center of the fovea is a yellow-green, indicating it’s started blending mipmaps into the full-resolution green image.
Of course, these conditions only hold if you’re emulating a 28” monitor from exactly 30 inches away. For a 1000” movie theater projector-sized panel at 4K resolution from 600in away (ie, consuming more than 45deg of your FoV), it will likely genuinely appear as if it were a 4K panel. Though interestingly, you can also see that the PPD dips significantly at the edges, just as KGOnTech reported it does.
For a 4K 1000” movie theater projector-sized screen, pixels are indeed sampled fully, except at the edge of the FoV where it visibly dips into mipmap level 1 in the fovea.
And if you juuuuust scoot that 1080p monitor 5 inches closer, the yellow haze is completely gone:
Yay, the yellow haze is gone.
Which, to be completely honest, makes a lot of sense! I believe the average movie viewing FoV (and the range where you actually get comfortable stereo overlap in the headset) is about 60 degrees anyhow, and it’s likely that Apple optimized their render texture resolutions for that. And I also happen to personally keep my desktop monitors at about that distance.
Wait, do desktop streamers even use mipmapping?
As one last double-checking measure, I think it’s also worth untangling another weird bit of nuance that kinda gets lost on this discussion, which is that ideally everything would be running locally on a headset, but currently the only way to really get Excel (or whatever other apps) is by streaming it from a PC–with all the fun nuances of H264/HEVC that come with that. A more subtle nuance though is that a PC streamer app really isn’t likely to use mipmapping at all, since generating mipmaps is rather costly for a texture that is (hopefully) being updated at 60+Hz.
However, when I think of text rendering tasks, the number one task I think of is reading text in a web browser, on-headset, and in that circumstance everything is for-sure 100% mipmapped. At least I hope it is. So examining whether text and line clarity can be impacted by this seems like something that’s fair to check.
Anyway the answer is yes, textures without mipmaps have strange artifacting with foveated rendering:
1px checkerboard grid at 1080p, with mipmaps generated. It has noticeable aliasing artifacts in some places but is overall fairly uniform
1px checkerboard grid at 1080p, with no mipmaps generated. It has extremely noticeable aliasing artifacts.
I guess there’s still maybe an argument that the yellow haze being present at all likely means this particular distance and render resolution will be prone to aliasing/clarity issues, regardless of whether mipmapping is on or off.
Can we optimize for clarity?
For dynamic images, technically my RealityKitShenanigans/ALVR rendering method allows for supersampling of distantly-rendered objects. However in practice, the resolution required for 40PPD without eye-tracked VRR will thermally throttle the Vision Pro within about 15-30mins (at least in my own burn-in tests). Maybe it’d work if Apple actually ran the fans harder, lol.
For static images and your average app dev, at best I think it might be possible to sharpen or otherwise filter lower mipmap levels to ensure that the linear blurring doesn’t inadvertently reach the virtual monitor while at awkward distances.
For the most part however, it’s worth keeping in mind that mipmapping may interfere with visual clarity at some distances, but even a partially-mipmap-blended image will likely benefit from temporal information the eyes are able to gather–by virtue of not sitting exactly still and headlocked to the virtual screen. Of course, head movement isn’t uniformly random by any means, but as long as the full-resolution texture is being sampled there’s at least some kind of odds each pixel in the fovea will be sampled with some clarity within a given timespan.
Also kinda makes me wonder if dithering/feathering/blending between different mipmap levels with randomized blue noise or something (on a GPU level, or maybe at a shader level idk) would have a potential benefit of increasing perceived clarity, by allowing higher-information texture samples to pass through prominently at awkward distances with actually-random chance. Idk, I’m not really a graphics programmer.
That being said, it’s usually best to not leave clarity up to random sampling chance. But it does mean that perceptual boundaries for clarity are likely blurrier than one might guess by merely looking at still images.
Takeaways
Is Apple Vision Pro the same effective resolution as Quest 3? It definitely is if you squint enough and/or aren’t careful with how you take through-the-lens shots. It arguably is if you happen to be rendering text on a virtual 28” 1080p panel from exactly 30” away using normal UI drawing methods. The Apple Vision Pro, due to its absurdly low framebuffer resolution of 1920x1824 (and no supersampling), is especially prone to half-res mipmap levels getting partially blended into virtual monitors/windows when they are rendered, possibly resulting in blurrier text in some circumstances. It’s also highly possible that future eye-tracked headsets will not be nearly as forgiving when it comes to photographing them.
In practice, though, there are genuinely more pixels to go around on the Apple Vision Pro: Eyes and heads have a tendency to not stay still, and all of that movement means that visuals will be sampled ever so slightly differently in the fovea. I would hazard a guess that in more difficult circumstances, it would be easier to recognize poorly-sampled text on an Apple Vision as opposed to a Quest 3 in a given timespan. Unfortunately cognitive load is difficult to quantify, and going too deep into temporal vision stuff risks alerting the 1kHz UFO gang.
I’d also say the real takeaway is to ding Apple for not having better supersampling/mipmap controls. There’s entire articles going over the intricacies of different mipmapping and supersampling methods for perceptual clarity in VR, and Apple’s rendering stack for 40PPD rendering doesn’t exactly lend itself well to any such things from a developer standpoint–everything is just de-facto unusually prone to aliasing and mipmapping clarity losses. But that’s also not exactly an optical issue, so I guess I’ve managed to at least clarify that.
TL;DR
Yes, the Vision Pro can have the same effective resolution as the Quest 3 if you happen to be rendering text on a virtual 28” 1080p panel from exactly 30” away.
The Quest 3 has better layer supersampling, and the Vision Pro has basically no supersampling and a low render texture resolution prone to mipmapping weirdness, but those are entirely software-fixable. And at the end of the day it still has more pixels, which matters because not everything is high-contrast text.
Also none of those mipmapping limitations apply to PCVR streaming with ALVR’s 40PPD renderer :^)
(assuming you can get 40PPD resolution to last more than 15mins before thermal throttling)
Source Code
Sources for the VRR testbench can be found on my GitHub at https://github.com/shinyquagsire23/VRRClarityTestbench. It’s not the most user-friendly but it’s MIT licensed so if someone feels like doing UI programming then go for it tbh.
Edit Notes and Numbers I Forgot
Edit (May 12 2024): I misremembered the vertical Drawable resolution, it is actually 1824 and not 1840. It has been corrected in the post.
Edit (May 12 2024): I found chat logs where I mentioned the unfoveated render PPD for Reality Composer, it is 20PPD.
Edit (May 12 2024): Because I’m probably going to keep forgetting to write these numbers down: