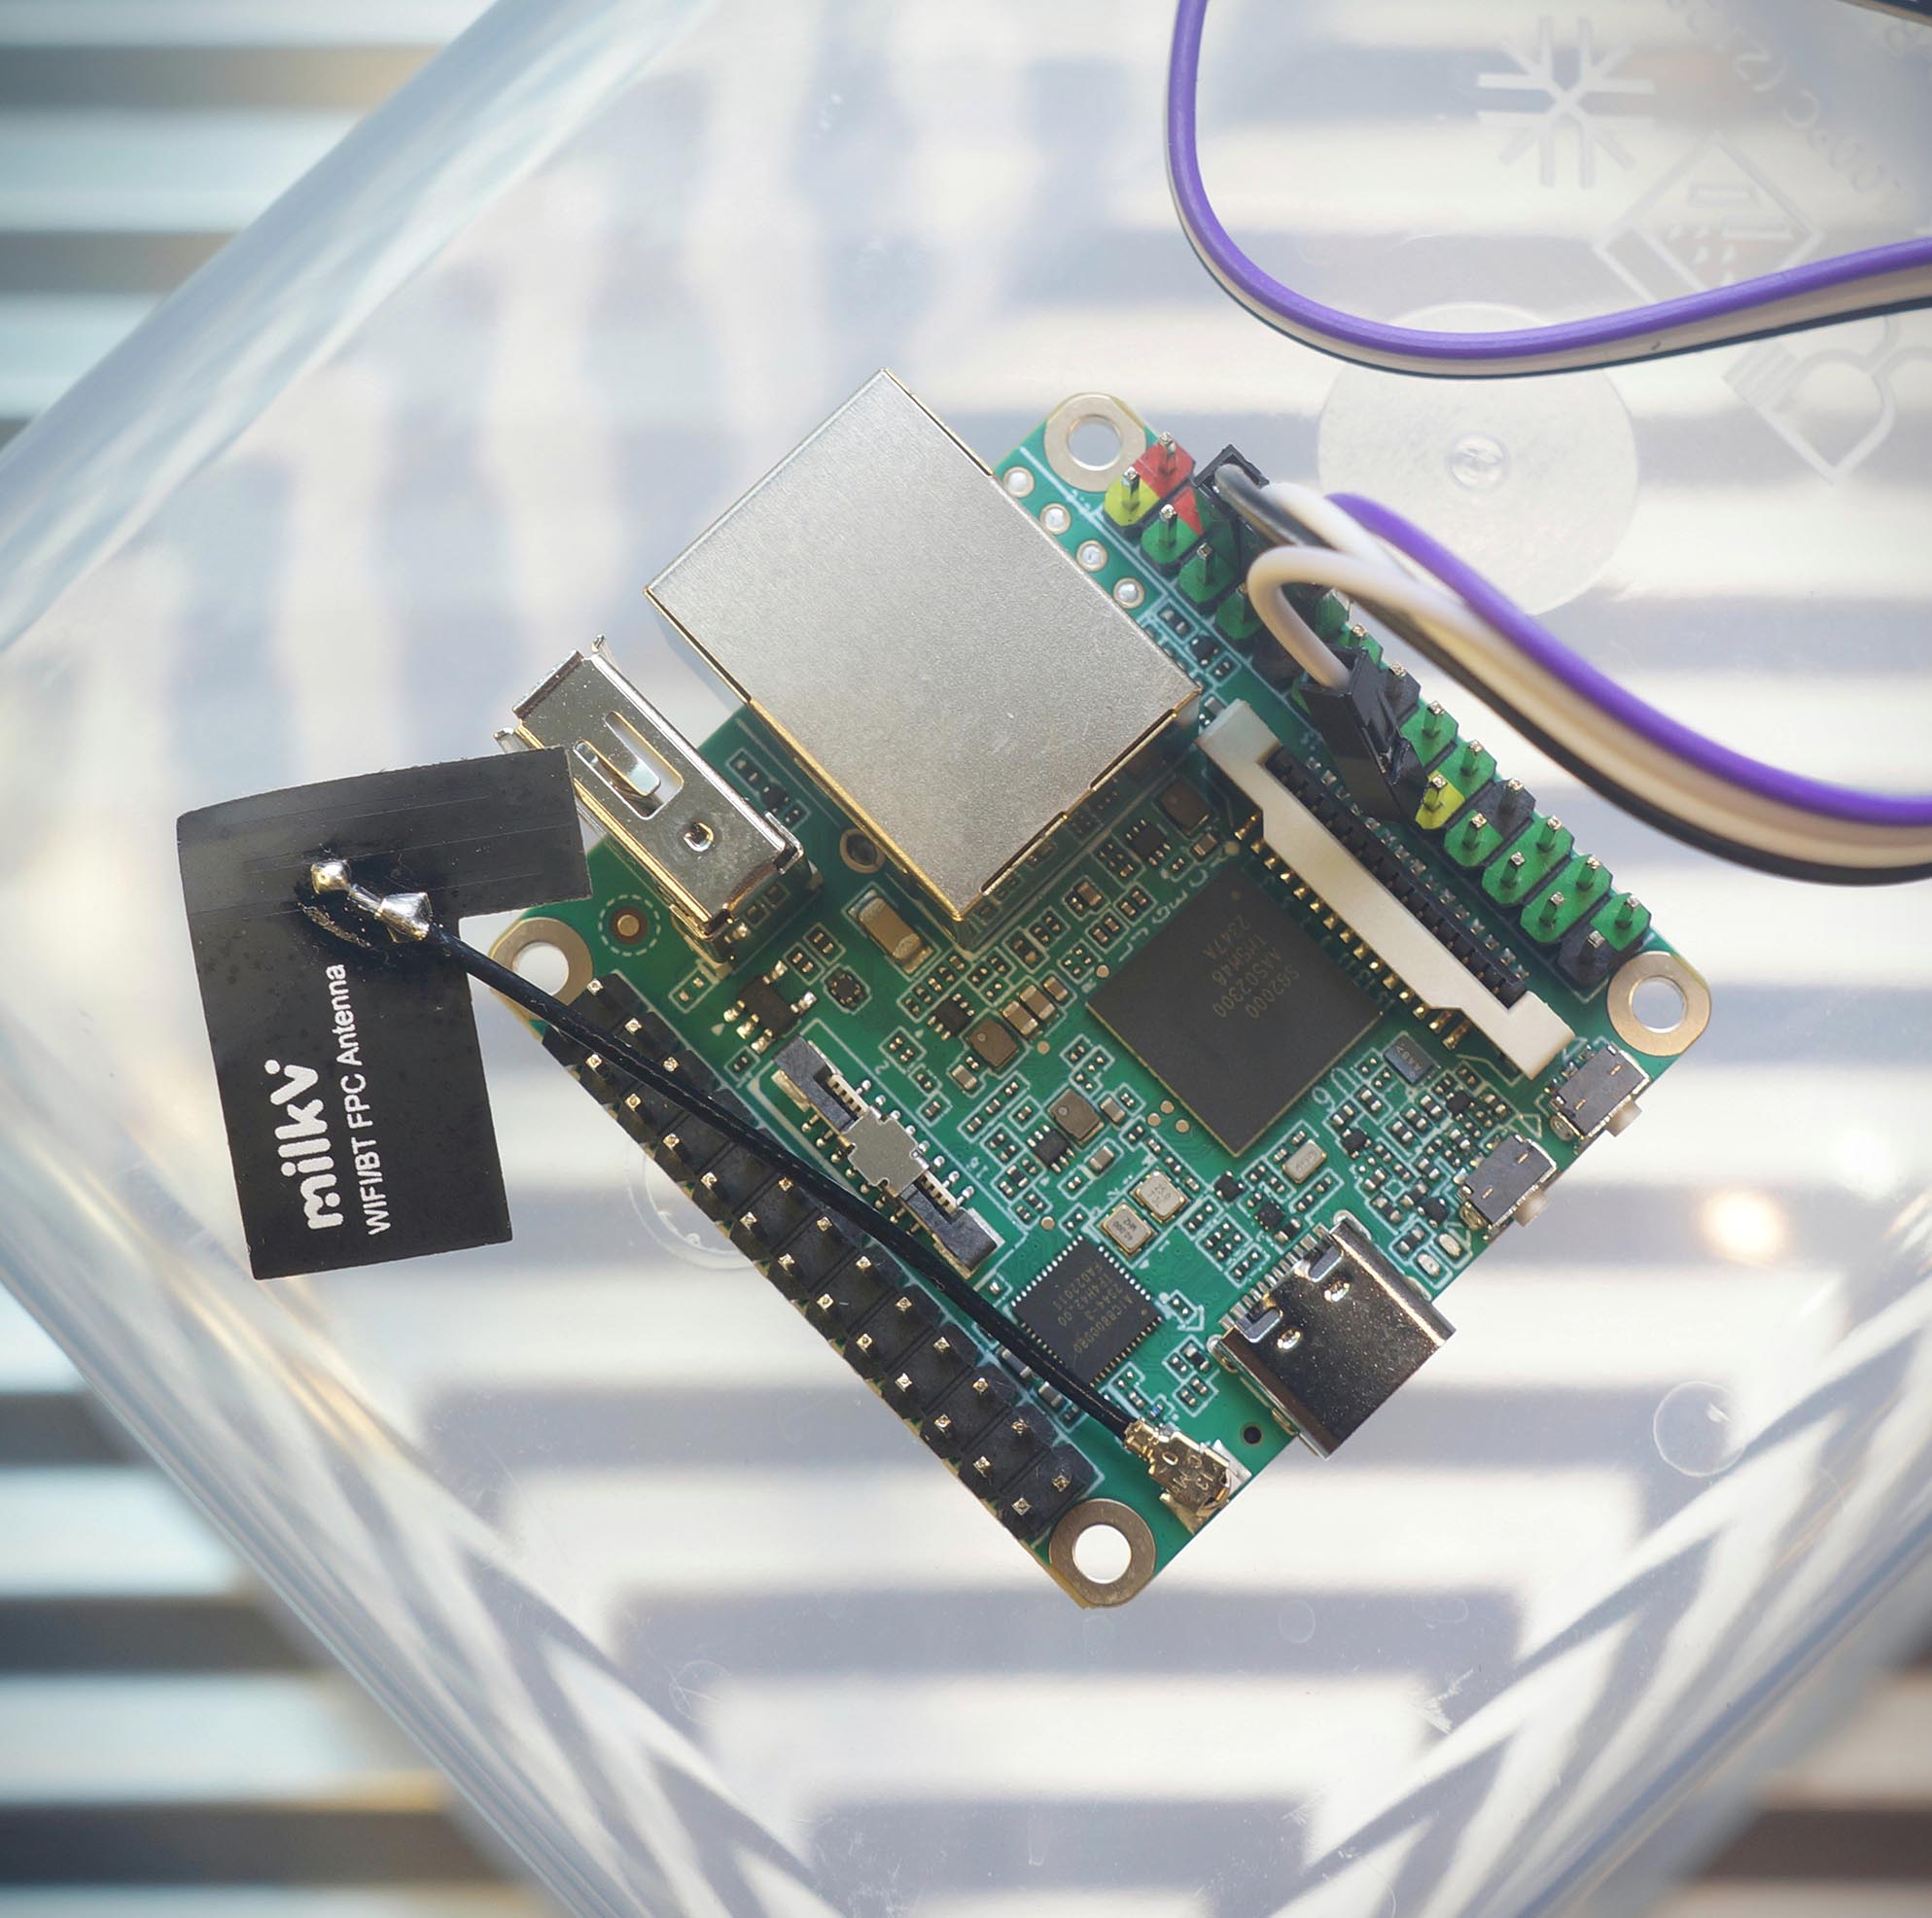
Apache NuttX RTOS on Sophgo SG2000 RISC-V SoC (Milk-V Duo S SBC)
???? 19 May 2024
Soon we’ll see many new 64-bit RISC-V SBCs based on the Sophgo SG2000 RISC-V SoC.
Will they work with Apache NuttX RTOS? (Real-Time Operating System) Let’s find out…
We boot Linux on Milk-V Duo S (with SG2000)
Peek inside SG2000 Linux and observe how it boots
Then we take NuttX for RISC-V (Ox64 BL808)
Tweak NuttX Kernel to boot on SG2000
Fix the (undocumented) Interrupt Controller
And Milk-V Duo S boots to a fully-functional NuttX Shell
Something strangely satisfying about NuttX on RISC-V… We finished the port in Only 10 Days ????
(Is this a sponsored review? I was given a Milk-V Duo S, and I bought another. So it cancels out I guess?)
§1 Sophgo SG2000 RISC-V SoC
Sophgo SG2000 SoC has a fascinating mix of 64-bit RISC-V Cores (Arm too)…
Main Processor: 64-bit RISC-V Core T-Head C906 (1.0 GHz) (For NuttX and Linux)
Co-Processor: 64-bit RISC-V Core T-Head C906 (700 MHz) (No Cache)
Alt-Main Processor: 64-bit Arm Core Cortex-A53 (1.0 GHz)
Plus a Low-Power 8051 MCU (for Wakeup Duties) and a Tensor Processing Unit (for Image Recognition, not LLM)
(See the SG2000 Reference Manual)
(See the Cvitek SDK Docs)
Whoa RISC-V AND Arm CPUs in a single SoC?
Actually there’s a Physical Switch that selects the Main CPU: RISC-V OR Arm.
Don’t let yer pet hamster flip it… It will get super frustrating!
(Sophgo / Sophon.ai comes from 3 Body)
§2 Boot Without MicroSD
What happens if we boot Milk-V Duo S? Fresh from the box?
Connect our USB UART Dongle according to the instructions (pic above)…
Milk-V Duo S USB UART GND (Pin 6) GND TX (Pin 8) RX RX (Pin 10) TX
USB UART Dongle must be CP2102, it doesn’t like CH340 ????
Flip the Switch so it’s set to “ RV ” (RISC-V) instead of “ Arm ”. (Pic above)
Power up the board via the USB-C Port. Connect to the USB UART at 115.2 kbps.
Milk-V Duo S won’t boot because it doesn’t ship with U-Boot Bootloader in Flash Memory…
C.SCS/0/0.WD.URPL.USBI.USBEF.BS/EMMC.EMI/25000000/12000000. E:eMMC initializing failed E:Boot failed E:RESET:plat/mars/platform.c:114
We’ll need U-Boot on MicroSD, in the next section.
(platform.c might be here)
If we see “ B.SCS ” instead of “ C.SCS ”…
B.SCS/0/0.WD.URPL.USBI.USBEF.BS/EMMC.EMI/25000000/12000000.
Nope we’re in Arm Mode… Flip the switch back to RISC-V!
If we use CH340 (instead of CP2102): UART Output will be gloriously garbled.
§3 Download the Linux MicroSD
Milk-V Duo S won’t boot without MicroSD. How now?
We boot Linux on MicroSD, thanks to the awesome work by Justin Hammond (Fishwaldo)…
We download the Latest Release for Milk-V Duo S (SG2000)…
Uncompress the Debian Image…
## For Linux: $ sudo apt install lz4 ## For macOS: $ brew install lz4 ## Uncompress the download to get `duos_sd.img` $ lz4 duos_sd.img.lz4
And write duos_sd.img to a MicroSD Card. Use Balena Etcher, GNOME Disks or dd .
We’ll see these MicroSD Files…
## MicroSD Root Folder $ ls -l /Volumes/boot -rwx 3494900 System.map-5.10.4-20240329-1+ -rwx 125534 config-5.10.4-20240329-1+ drwx 2048 extlinux drwx 2048 fdt -rwx 388608 fip.bin -rwx 4937389 vmlinuz-5.10.4-20240329-1+ ## U-Boot Bootloader Config $ ls -l /Volumes/boot/extlinux -rwx 749 extlinux.conf ## Linux Device Tree for SG2000 $ ls -l /Volumes/boot/fdt/linux-image-duos-5.10.4-20240329-1+ -rwx 21575 cv181x_milkv_duos_sd.dtb
We peek at the U-Boot Bootloader Config (which will boot NuttX with a tiny tweak)
$ cat /Volumes/boot/extlinux/extlinux.conf ... menu label Debian GNU/Linux trixie/sid 5.10.4-20240329-1+ linux /vmlinuz-5.10.4-20240329-1+ fdtdir /fdt/linux-image-duos-5.10.4-20240329-1+/ append root=/dev/root console=ttyS0,115200 earlycon=sbi root=/dev/mmcblk0p2 rootwait rw
Watch what happens when we boot the MicroSD…
§4 Boot the Linux MicroSD
Linux on MicroSD: Will it boot on Milk-V Duo S?
Yep Linux boots OK. First we see OpenSBI (Supervisor Binary Interface)…
OpenSBI v0.9 Platform Name : Milk-V DuoS Platform Features : mfdeleg Platform HART Count : 1 Platform Console Device : uart8250 Firmware Base : 0x8000_0000 Firmware Size : 132 KB Runtime SBI Version : 0.3 Domain0 Region00 : 0x7400_0000-0x7400_ffff (I) Domain0 Region01 : 0x8000_0000-0x8003_ffff () Domain0 Region02 : 0x0-0xffff_ffff_ffff_ffff (R,W,X) Boot HART ISA : rv64imafdcvsux Boot HART Features : scounteren,mcounteren,time Boot HART MIDELEG : 0x0222 Boot HART MEDELEG : 0xb109 ## OpenSBI boots at 0x8000_0000. ## 0x7400_0000 looks interesting! We'll come back to this
(See the Complete Log)
Followed by the U-Boot Bootloader…
## U-Boot Boots U-Boot 2021.10-ga57aa1f2-dirty (Apr 24 2024 - 11:24:46 +0000) cvitek_cv181x Hit any key to stop autoboot: 0 Scanning mmc 0:1... Found /extlinux/extlinux.conf ## U-Boot Menu 1:.Debian GNU/Linux trixie/sid 5.10.4-20240329-1+ 2:.Debian GNU/Linux trixie/sid 5.10.4-20240329-1+ (rescue target) Enter choice: 1 ## U-Boot boots Debian Linux Retrieving file: /vmlinuz-5.10.4-20240329-1+ Retrieving file: /fdt/linux-image-duos-5.10.4-20240329-1+/cv181x_milkv_duos_sd.dtb Booting using the fdt blob at 0x81200000
Finally we see Debian Linux…
Starting kernel ... Linux version 5.10.4-20240329-1+ (root@3abcc283c6ba) (riscv64-unknown-linux-musl-gcc (Xuantie-900 linux-5.10.4 musl gcc Toolchain V2.6.1 B-20220906) 10.2.0, GNU ld (GNU Binutils) 2.35) ... Debian GNU/Linux trixie/sid duos ttyS0 duos login:
Linux works great, we hop over to NuttX…
(Cvitek is the old name of Sophgo / Sophon)
§5 Settings for U-Boot Bootloader
How will we boot NuttX?
We seek guidance from the U-Boot Bootloader.
As we power on Milk-V Duo S, hit Enter a few times to see the U-Boot Command Prompt…
U-Boot 2021.10-ga57aa1f2-dirty (May 07 2024 - 08:13:12 +0000) cvitek_cv181x Loading Environment from FAT... mmc1 : finished tuning, code:53 Hit any key to stop autoboot: 0 cv181x_c906#
Enter printenv to dump the U-Boot Settings…
## U-Boot Settings $ printenv kernel_addr_r=0x80200000 kernel_comp_addr_r=0x81800000 kernel_comp_size=0x1000000 ramdisk_addr_r=0x84000000 uImage_addr=0x81800000 update_addr=0x9fe00000
(See the U-Boot Settings)
kernel_addr_r says that U-Boot will load Linux Kernel into RAM at Address 0x8020_0000 . (We’ll set this in NuttX)
And the Ethernet Driver is fully operational in U-Boot. Which means we can boot NuttX over the Network…
$ net list eth0: ethernet@4070000 00:00:00:00:00:00 active
Here’s how…
(See the U-Boot Commands)
§6 Boot NuttX over TFTP
What’s the quickest way to port NuttX to SG2000?
Like Linux, we could copy NuttX to MicroSD, insert into Milk-V Duo S and power up. Again and again and again…
But there’s a quicker way: Boot NuttX over the Network, thanks to U-Boot Bootloader and TFTP (Trivial File Transfer Protocol)
Follow the instructions here to install our TFTP Server. Copy these files to our TFTP Server…
At the U-Boot Command Prompt: We configure our TFTP Server…
## Set the U-Boot TFTP Server ## TODO: Change to your TFTP Server setenv tftp_server 192.168.31.10 ## If Initial RAM Disk is needed (like for Linux, not for NuttX)... ## Set the RAM Disk Size (assume the max) ## setenv ramdisk_size 0x1000000 ## Save the U-Boot Config for future reboots saveenv
Then we load the NuttX Image into RAM over TFTP…
## Fetch the IP Address over DHCP ## Load the NuttX Image from TFTP Server ## kernel_addr_r=0x80200000 dhcp ${kernel_addr_r} ${tftp_server}:Image-sg2000 ## Load the Device Tree from TFTP Server ## fdt_addr_r=0x81200000 ## TODO: Fix the Device Tree, it's not needed by NuttX tftpboot ${fdt_addr_r} ${tftp_server}:cv181x_milkv_duos_sd.dtb ## Set the RAM Address of Device Tree ## fdt_addr_r=0x81200000 ## TODO: Fix the Device Tree, it's not needed by NuttX fdt addr ${fdt_addr_r} ## If Initial RAM Disk is needed... ## Load the Intial RAM Disk from TFTP Server ## ramdisk_addr_r=0x81600000 ## tftpboot ${ramdisk_addr_r} ${tftp_server}:initrd
And we boot NuttX from RAM…
## Boot the NuttX Image with the Device Tree ## kernel_addr_r=0x80200000 ## fdt_addr_r=0x81200000 ## TODO: Fix the Device Tree, it's not needed by NuttX booti ${kernel_addr_r} - ${fdt_addr_r} ## For Linux: We need the RAM Disk Address ## ramdisk_addr_r=0x81600000 ## ramdisk_size=0x1000000 ## booti ${kernel_addr_r} ${ramdisk_addr_r}:${ramdisk_size} ${fdt_addr_r}
What happens when we boot NuttX?
Absolutely nothing…
## Boot NuttX over TFTP, mashed up in a single line... $ dhcp ${kernel_addr_r} ${tftp_server}:Image-sg2000 ; tftpboot ${fdt_addr_r} ${tftp_server}:cv181x_milkv_duos_sd.dtb ; fdt addr ${fdt_addr_r} ; booti ${kernel_addr_r} - ${fdt_addr_r} Booting using the fdt blob at 0x81200000 Loading Ramdisk to 9e27f000, end 9f27f000 ... OK Loading Device Tree to 9e26f000, end 9e27e43a ... OK Starting kernel ...
But that’s OK, we haven’t modified NuttX Kernel for SG2000. We’ll print something in a while.
We type these commands EVERY TIME we boot?
We can automate: Just do this once, and NuttX will Auto-Boot whenever we power up…
## Add the Boot Command for TFTP setenv bootcmd_tftp 'dhcp ${kernel_addr_r} ${tftp_server}:Image-sg2000 ; tftpboot ${fdt_addr_r} ${tftp_server}:cv181x_milkv_duos_sd.dtb ; fdt addr ${fdt_addr_r} ; booti ${kernel_addr_r} - ${fdt_addr_r}' ## Save it for future reboots saveenv ## Test the Boot Command for TFTP, then reboot run bootcmd_tftp ## Remember the Original Boot Targets: `mmc0 dhcp pxe` setenv orig_boot_targets "$boot_targets" ## Prepend TFTP to the Boot Targets: `tftp mmc0 dhcp pxe` setenv boot_targets "tftp $boot_targets" ## Save it for future reboots saveenv
(What about Static IP?)
(How to Undo Auto-Boot)
§7 UART Controller for SG2000
How will NuttX print to the Serial Console?
First we track down the UART Controller for SG2000.
From SG2000 Reference Manual (Page 638): The UART Controller is at these Base Addresses (we’ll talk to UART0)
UART Module Base Address UART0 0x0414_0000 UART1 0x0415_0000 UART2 0x0416_0000 UART3 0x0417_0000 UART4 0x041C_0000 RTCSYS_UART 0x0502_2000
What UART Controller is inside SG2000?
According to OpenSBI Log: The UART Controller is uart8250 .
Which is supported by NuttX. We mod the NuttX Boot Code to print something…
§8 Print to UART in RISC-V Assembly
Printing in RISC-V Assembly? Why not C?
That’s because the very first thing that boots is the NuttX Boot Code in RISC-V Assembly (instead of C)…
SG2000 UART0 Controller is at 0x0414_0000 (previous section). To print something, we write to the UART Output Register at that address: bl808_head.S
/* RISC-V Boot Code for Apache NuttX RTOS */ real_start: /* Print `123` to UART */ /* Load UART Base Address to Register t0 */ li t0, 0x04140000 /* Load `1` to Register t1 */ li t1, 0x31 /* Store byte from Register t1 to UART Base Address, Offset 0 */ sb t1, 0(t0) /* Load `2` to Register t1 */ li t1, 0x32 /* Store byte from Register t1 to UART Base Address, Offset 0 */ sb t1, 0(t0) /* Load `3` to Register t1 */ li t1, 0x33 /* Store byte from Register t1 to UART Base Address, Offset 0 */ sb t1, 0(t0)
( li loads a Value into a Register)
( sb stores a byte from a Register into an Address)
Our code will print “ 123 ” when NuttX boots. We test this…
§9 NuttX Boots A Tiny Bit
Follow these steps to build Apache NuttX RTOS for SG2000 and Milk-V Duo S…
This produces the NuttX Image File: Image-sg2000 . Which we copy to our TFTP Server…
## Copy NuttX Image and Device Tree to TFTP Server ## TODO: Change `tftpserver` and `tftpboot` to our TFTP Server and Path scp Image-sg2000 \ tftpserver:/tftpboot/Image-sg2000 scp cv181x_milkv_duos_sd.dtb \ tftpserver:/tftpboot/cv181x_milkv_duos_sd.dtb
(cv181x_milkv_duos_sd.dtb is here)
To Boot NuttX: Run these commands at the U-Boot Command Prompt…
## Load NuttX Image and Device Tree into RAM $ dhcp ${kernel_addr_r} ${tftp_server}:Image-sg2000 $ tftpboot ${fdt_addr_r} ${tftp_server}:cv181x_milkv_duos_sd.dtb $ fdt addr ${fdt_addr_r} ## Boot NuttX from RAM $ booti ${kernel_addr_r} - ${fdt_addr_r} Starting kernel ... 123
See the “ 123 ”? That’s proof that our NuttX Boot Code is actually running on SG2000 and Milk-V Duo S. We port some more…
(See the Complete Log)
§10 NuttX Kernel Boots OK
NuttX Kernel prints “123”. What about the rest?
More mods for NuttX Kernel…
After applying the above fixes: NuttX Kernel boots successfully! (Pic above)
## Load NuttX Image and Device Tree into RAM $ dhcp ${kernel_addr_r} ${tftp_server}:Image-sg2000 $ tftpboot ${fdt_addr_r} ${tftp_server}:cv181x_milkv_duos_sd.dtb $ fdt addr ${fdt_addr_r} ## Boot NuttX from RAM $ booti ${kernel_addr_r} - ${fdt_addr_r} Starting kernel ... 123ABCnx_start: Entry uart_register: Registering /dev/console uart_register: Registering /dev/ttyS0 work_start_lowpri: Starting low-priority kernel worker thread(s) nxtask_activate: lpwork pid=1,TCB=0x80408130 nxtask_activate: AppBringUp pid=2,TCB=0x80408740 nx_start_application: Starting init task: /system/bin/init elf_symname: Symbol has no name elf_symvalue: SHN_UNDEF: Failed to get symbol name: -3 elf_relocateadd: Section 2 reloc 2: Undefined symbol[0] has no name: -3 nxtask_activate: /system/bin/init pid=3,TCB=0x80409140 nxtask_exit: AppBringUp pid=2,TCB=0x80408740
One last thing and we’re done…
(See the Complete Log)
(Watch the Demo on YouTube)
§11 NuttX Shell Too!
NuttX Kernel boots OK. Where’s the NuttX Shell?
We won’t see the NuttX Shell until we fix the Interrupt Controller for SG2000. Which is NOT documented. (Sigh)
That’s because NuttX Shell requires UART Input Interrupts AND UART Output Interrupts, to support Console Input / Output.
Thus we sniff around and find out how the Interrupt Controller works.
After fixing the Interrupt Controller and UART Interrupts: Our Final NuttX Image boots all the way to NuttX Shell! (Pic above)
## Load NuttX Image and Device Tree into RAM $ dhcp ${kernel_addr_r} ${tftp_server}:Image-sg2000 $ tftpboot ${fdt_addr_r} ${tftp_server}:cv181x_milkv_duos_sd.dtb $ fdt addr ${fdt_addr_r} ## Boot NuttX from RAM $ booti ${kernel_addr_r} - ${fdt_addr_r} Starting kernel ... NuttShell (NSH) NuttX-12.4.0 nsh> uname -a NuttX 12.4.0 122c717 May 8 2024 18:13:30 risc-v ox64 nsh> ls /: dev/ proc/ system/ nsh> ls /dev /dev: console null ram0 ttyS0 zero
(See the Complete Log)
What about the rest of NuttX?
NuttX OSTest is the perfect way to test everything in NuttX…
nsh> ostest user_main: mutex test riscv_exception: EXCEPTION: Load access fault MCAUSE: 5 EPC: 802189ce MTVAL: 0000000000000000 Segmentation fault in PID 7: ostest
Sadly we’re hitting a RISC-V Exception: Load Access Fault. Needs more troubleshooting alamak.
(See the Complete Log)
What happens exactly when NuttX boots on SG2000?
Exact same thing as NuttX booting on Ox64 BL808 SBC (pic above)…
§12 What’s Next
We’re eagerly awaiting the new 64-bit RISC-V SBCs based on the Sophgo SG2000 RISC-V SoC. Meanwhile we’re all prepped and ready…
We tested Linux on Milk-V Duo S (SG2000 inside)
And observed how SG2000 Linux boots
Then we took NuttX for Ox64 BL808
Tweaked the NuttX Kernel to boot on SG2000
Also fixed the (undocumented) Interrupt Controller
Milk-V Duo S now boots to a fully-functional NuttX Shell
Something strangely super satisfying about NuttX on SG2000… We finished the port in Only 10 Days ????
Up Next…
We’ll Upstream SG2000 to NuttX Mainline (So others may contribute their code) Create an SG2000 Emulator for easier testing (Similar to TinyEMU for Ox64) We might run NuttX on the SG2000 Co-Processor (Plus SG2002 with its upsized TPU / NPU) Join me online at the Apache NuttX International Workshop (We’ll Q&A about Ox64 BL808 and SG2000)
Many Thanks to my GitHub Sponsors (and the awesome NuttX Community) for supporting my work! This article wouldn’t have been possible without your support.
Got a question, comment or suggestion? Create an Issue or submit a Pull Request here…
lupyuen.github.io/src/sg2000.md
§13 Appendix: Build NuttX for SG2000
In this article we took NuttX for Ox64 BL808 RISC-V SBC. Then made a few tweaks, and it boots on SG2000 and Milk-V Duo S…
Follow these steps to build (work-in-progress) Apache NuttX RTOS for SG2000 and Milk-V Duo S…
Install the Build Prerequisites, skip the RISC-V Toolchain…
Download the RISC-V Toolchain for riscv64-unknown-elf (SiFive) or riscv-none-elf (xPack)…
Then Download and Build NuttX…
## For xPack Toolchain: ## Change all `riscv64-unknown-elf` to `riscv-none-elf` set -e # Exit when any command fails set -x # Echo commands ## Build NuttX function build_nuttx { ## Go to NuttX Folder pushd ../nuttx ## Build NuttX make -j 8 ## Return to previous folder popd } ## Build Apps Filesystem function build_apps { ## Go to NuttX Folder pushd ../nuttx ## Build Apps Filesystem make -j 8 export pushd ../apps ./tools/mkimport.sh -z -x ../nuttx/nuttx-export-*.tar.gz make -j 8 import popd ## Return to previous folder popd } ## Download WIP NuttX for SG2000 (based on Ox64 BL808) git clone --branch sg2000 \ https://github.com/lupyuen2/wip-nuttx \ nuttx git clone --branch sg2000 \ https://github.com/lupyuen2/wip-nuttx-apps \ apps cd nuttx ## Pull updates git pull && git status && hash1=`git rev-parse HEAD` pushd ../apps git pull && git status && hash2=`git rev-parse HEAD` popd echo NuttX Source: https://github.com/apache/nuttx/tree/$hash1 >nuttx.hash echo NuttX Apps: https://github.com/apache/nuttx-apps/tree/$hash2 >>nuttx.hash ## Show the version of GCC riscv64-unknown-elf-gcc -v ## Configure the build tools/configure.sh ox64:nsh ## Build the NuttX Kernel build_nuttx ## Build the Apps Filesystem build_apps ## Generate the Initial RAM Disk genromfs -f initrd -d ../apps/bin -V "NuttXBootVol" ## Show the NuttX Kernel Size riscv64-unknown-elf-size nuttx ## Export the Kernel Binary Image to `nuttx.bin` riscv64-unknown-elf-objcopy \ -O binary \ nuttx \ nuttx.bin ## Prepare a Padding with 64 KB of zeroes head -c 65536 /dev/zero >/tmp/nuttx.pad ## Append the Padding and Initial RAM Disk to NuttX Kernel cat nuttx.bin /tmp/nuttx.pad initrd \ >Image ## Copy the NuttX Config cp .config nuttx.config ## Dump the NuttX Kernel Disassembly to nuttx.S riscv64-unknown-elf-objdump \ --syms --source --reloc --demangle --line-numbers --wide \ --debugging \ nuttx \ >nuttx.S \ 2>&1 ## Dump the NuttX Shell Disassembly to init.S riscv64-unknown-elf-objdump \ --syms --source --reloc --demangle --line-numbers --wide \ --debugging \ ../apps/bin/init \ >init.S \ 2>&1 ## Dump the Hello Disassembly to hello.S riscv64-unknown-elf-objdump \ --syms --source --reloc --demangle --line-numbers --wide \ --debugging \ ../apps/bin/hello \ >hello.S \ 2>&1 ## Copy the NuttX Image and Device Tree to our TFTP Server. ## Device Tree is here: https://github.com/lupyuen2/wip-nuttx/releases/download/sg2000-1/cv181x_milkv_duos_sd.dtb cp Image Image-sg2000 scp Image-sg2000 tftpserver:/tftpboot/Image-sg2000 scp cv181x_milkv_duos_sd.dtb tftpserver:/tftpboot/cv181x_milkv_duos_sd.dtb
(See the Build Outputs)
The steps above assume that we’ve installed our TFTP Server, according to the instructions here.
Then follow these steps to boot NuttX on Milk-V Duo S…
“Boot NuttX over TFTP” (How to boot from MicroSD instead of TFTP?)
Why the RAM Disk? Isn’t NuttX an RTOS?
SG2000 uses a RAM Disk because it runs in NuttX Kernel Mode (instead of the typical Flat Mode). This means we can do Memory Protection and Virtual Memory for Apps. (Pic above)
But it also means we need to bundle the NuttX Apps as ELF Files, hence the RAM Disk…
Most of the NuttX Platforms run on NuttX Flat Mode, which has NuttX Apps Statically-Linked into the NuttX Kernel.
NuttX Flat Mode works well for Small Microcontrollers. But SG2000 and other SoCs will need the more sophisticated NuttX Kernel Mode…
§14 Appendix: Port NuttX to SG2000
How did we port NuttX to SG2000?
We started with NuttX for Ox64 BL808 RISC-V SBC. Then made a few tweaks, and it boots on SG2000 and Milk-V Duo S. This chapter explains the minor tweaks that we made. (Pic above)
Why did we start with NuttX for Ox64?
That’s because Ox64 BL808 runs on the same RISC-V Core as SG2000: T-Head C906.
What about the T-Head Extensions for C906?
Yep we copied (unchanged) the T-Head Extensions for C906 from Ox64 BL808 to SG2000. And they work hunky dory on SG2000…
Let’s talk about the tweaks…
§14.1 NuttX Memory Map
From U-Boot Bootloader Settings: We see that SG2000 boots at this address…
kernel_addr_r=0x80200000
Thus we define the NuttX Memory Map for SG2000 like so…
NuttX Kernel will boot at 0x8020_0000 , NuttX Apps will run at Virtual Address 0xC000_0000 .
Here’s the NuttX Config: nsh/defconfig
## Kernel RAM ## TODO: Fix the size CONFIG_RAM_START=0x80200000 CONFIG_RAM_SIZE=1048576 ## Kernel Paged Pool (Allocated to NuttX Apps) ## TODO: Fix the size CONFIG_ARCH_PGPOOL_PBASE=0x80600000 CONFIG_ARCH_PGPOOL_VBASE=0x80600000 CONFIG_ARCH_PGPOOL_SIZE=4194304 ## Virtual Memory for NuttX App Code CONFIG_ARCH_TEXT_VBASE=0xC0000000 CONFIG_ARCH_TEXT_NPAGES=128 ## Virtual Memory for NuttX App Data CONFIG_ARCH_DATA_VBASE=0xC0100000 CONFIG_ARCH_DATA_NPAGES=128 ## Virtual Memory for NuttX App Heap CONFIG_ARCH_HEAP_VBASE=0xC0200000 CONFIG_ARCH_HEAP_NPAGES=128
And here’s the NuttX Linker Script: ld.script
/* TODO: Fix the size */ MEMORY { kflash (rx) : ORIGIN = 0x80200000, LENGTH = 2048K /* w/ cache */ ksram (rwx) : ORIGIN = 0x80400000, LENGTH = 2048K /* w/ cache */ pgram (rwx) : ORIGIN = 0x80600000, LENGTH = 4096K /* w/ cache */ ramdisk (rwx) : ORIGIN = 0x80A00000, LENGTH = 16M /* w/ cache */ } ... SECTIONS { . = 0x80200000;
§14.2 Select the 16550 UART Driver
From OpenSBI Log: We see that SG2000 runs with a 8250 UART Controller.
Thus we select the NuttX Driver for 16550 UART, which is compatible with 8250…
Here’s the NuttX Config: nsh/defconfig
CONFIG_16550_ADDRWIDTH=0 CONFIG_16550_REGINCR=4 CONFIG_16550_UART0=y CONFIG_16550_UART0_BASE=0x04140000 CONFIG_16550_UART0_CLOCK=23040000 CONFIG_16550_UART0_SERIAL_CONSOLE=y CONFIG_16550_UART=y CONFIG_16550_WAIT_LCR=y CONFIG_SERIAL_UART_ARCH_MMIO=y
Don’t update the NuttX Config File directly! We ran make menuconfig to generate the above file…
## Update NuttX Config make menuconfig \ && make savedefconfig \ && grep -v CONFIG_HOST defconfig \ >boards/risc-v/bl808/ox64/configs/nsh/defconfig
To Find Menuconfig Settings: Press “ / ” and enter the name of the setting, like “16550_ADDRWIDTH”. This ensures that the Kconfig Dependencies are correctly updated.
How did we get IRQ 69 for UART?
We set IRQ 69 for UART0…
That’s because the SG2000 Reference Manual (Page 13) says…
3.1 Interrupt Subsystem
Table 3.2: Interrupt number and Interrupt source mapping for Master RISCV C906 @ 1.0Ghz
Int #44: UART0
Linux Device Tree also says UART0 IRQ is 44 ( 0x2C )
serial@04140000 { compatible = "snps,dw-apb-uart"; reg = <0x00 0x4140000 0x00 0x1000>; clock-frequency = <0x17d7840>; reg-shift = <0x02>; reg-io-width = <0x04>; status = "okay"; interrupts = <0x2c 0x04>; interrupt-parent = <0x04>; };
Thus we compute NuttX IRQ = 25 + RISC-V IRQ = 69
(We should fix the UART Clock: 16550_UART0_CLOCK)
§14.3 Disable Interrupt Controller
Most RISC-V SBCs (Ox64, Star64) will manage Interrupts with a Platform-Level Interrupt Controller (PLIC). But PLIC isn’t documented for SG2000. (Pic above sigh)
Initially we disable PLIC in NuttX…
Later we’ll dump the SG2000 Linux Device Tree to understand the Interrupt Controller.
§14.4 Dump the Linux Device Tree
To understand the Interrupt Controller: We dump the Linux Device Tree for SG2000.
Based on the SG2000 Debian Image, thanks to Justin Hammond (Fishwaldo)…
We download the Latest Release for Milk-V Duo S (SG2000)…
Then copy out the SG2000 Device Tree Binary: cv181x_milkv_duos_sd.dtb
And convert it to Device Tree Source: cv181x_milkv_duos_sd.dts
## Convert the SG2000 Device Tree dtc \ -o cv181x_milkv_duos_sd.dts \ -O dts \ -I dtb \ cv181x_milkv_duos_sd.dtb
We go inside the Device Tree…
§14.5 Interrupt Controller for SG2000
Earlier we dumped the Linux Device Tree for SG2000. We snoop inside to understand the Interrupt Controller: cv181x_milkv_duos_sd.dts
// PLIC Interrupt Controller for External Interrupts interrupt-controller@70000000 { riscv,ndev = <0x65>; riscv,max-priority = <0x07>; reg-names = "control"; reg = <0x00 0x70000000 0x00 0x4000000>; interrupts-extended = <0x16 0xffffffff 0x16 0x09>; interrupt-controller; compatible = "riscv,plic0"; #interrupt-cells = <0x02>; #address-cells = <0x00>; phandle = <0x04>; }; // CLINT Interrupt Controller for Internal Interrupts clint@74000000 { interrupts-extended = <0x16 0x03 0x16 0x07>; reg = <0x00 0x74000000 0x00 0x10000>; compatible = "riscv,clint0"; clint,has-no-64bit-mmio; };
We see that PLIC (External Interrupts) is at 0x7000_0000 , CLINT (Internal Interrupts) at 0x7400_0000 …
§14.6 Fix the NuttX Driver for PLIC
Based on the PLIC Address from above: We fix the Platform-Level Interrupt Controller (PLIC) for SG2000…
Now we see a bit more NuttX…
Starting kernel ... 123ABCnx_start: Entry uart_register: Registering /dev/console uart_register: Registering /dev/ttyS0 work_start_lowpri: Starting low-priority kernel worker thread(s) nxtask_activate: lpwork pid=1,TCB=0x80409130 nxtask_activate: AppBringUp pid=2,TCB=0x80409740 nx_start_application: Starting init task: /system/bin/init elf_symname: Symbol has no name elf_symvalue: SHN_UNDEF: Failed to get symbol name: -3 elf_relocateadd: Section 2 reloc 2: Undefined symbol[0] has no name: -3 nxtask_activate: /system/bin/init pid=3,TCB=0x8040b730 nxtask_exit: AppBringUp pid=2,TCB=0x80409740 Nuttnx_start: CPU0: Beginning Idle Loop
(See the Complete Log)
Why did it stop?
Duh we set the wrong UART0 IRQ! Here’s the fix…
§14.7 Enable Logging for Scheduler
For easier troubleshooting: We enable Logging for NuttX Scheduler and Binary Loader…
Here’s the NuttX Config: nsh/defconfig
CONFIG_DEBUG_BINFMT=y CONFIG_DEBUG_BINFMT_ERROR=y CONFIG_DEBUG_BINFMT_WARN=y CONFIG_DEBUG_SCHED=y CONFIG_DEBUG_SCHED_ERROR=y CONFIG_DEBUG_SCHED_INFO=y CONFIG_DEBUG_SCHED_WARN=y
Remember: Always use make menuconfig to update the settings!
§14.8 NuttX Crash Dump
What happens when something goes wrong in NuttX?
We’ll see a NuttX Crash Dump, like so…
Booting using the fdt blob at 0x81200000 Loading Ramdisk to 9fe00000, end 9fe00000 ... OK Loading Device Tree to 000000009f26f000, end 000000009f27e43a ... OK Starting kernel ... 123ABCnx_start: Entry uart_register: Registering /dev/console uart_register: Registering /dev/ttyS0 work_start_lowpri: Starting low-priority kernel worker thread(s) nxtask_activate: lpwork pid=1,TCB=0x80408130 nxtask_activate: AppBringUp pid=2,TCB=0x80408740 nx_start_application: Starting init task: /system/bin/init elf_symname: Symbol has no name elf_symvalue: SHN_UNDEF: Failed to get symbol name: -3 elf_relocateadd: Section 2 reloc 2: Undefined symbol[0] has no name: -3 _assert: Current Version: NuttX 12.4.0 f37a380-dirty May 7 2024 10:31:33 risc-v _assert: Assertion failed 0x17 == (insn & 0x7F): at file: machine/risc-v/arch_elf.c:494 task: AppBringUp process: Kernel 0x80200f34 up_dump_register: EPC: 000000008021087a up_dump_register: A0: 0000000080401b70 A1: 00000000000001ee A2: 0000000080228ef8 A3: 0000000000000000 up_dump_register: A4: 0000000000000017 A5: 0000000000000002 A6: 000000000000ab9c A7: fffffffffffffff8 up_dump_register: T0: 000000000000002e T1: 0000000000000007 T2: 00000000000001ff T3: 000000008040c3fc up_dump_register: T4: 000000008040c3f0 T5: 0000000000000009 T6: 000000000000002a up_dump_register: S0: 0000000000000000 S1: 0000000080408740 S2: 0000000000000017 S3: 0000000000000000 up_dump_register: S4: 0000000080228ef8 S5: 0000000080228de8 S6: 0000000080401e10 S7: 8000000201842022 up_dump_register: S8: 00000000000001ee S9: 000000008040b9a0 S10: 0000000000000070 S11: 000000008040b990 up_dump_register: SP: 000000008040c330 FP: 0000000000000000 TP: 0000000000000000 RA: 000000008021087a dump_stack: User Stack: dump_stack: base: 0x8040c030 dump_stack: size: 00002000 dump_stack: sp: 0x8040c330
(See the Complete Log)
What’s this Assertion Failure?
_assert: Assertion failed 0x17 == (insn & 0x7F): at file: machine/risc-v/arch_elf.c:494 task: AppBringUp process: Kernel 0x80200f34
Oops we goofed and used the Wrong U-Boot Command…
## Nope! This won't work for NuttX. RAM Disk Address must be `-`! setenv tftp_server 192.168.31.10 ; dhcp ${kernel_addr_r} ${tftp_server}:Image-sg2000 ; tftpboot ${fdt_addr_r} ${tftp_server}:cv181x_milkv_duos_sd.dtb ; fdt addr ${fdt_addr_r} ; booti ${kernel_addr_r} ${ramdisk_addr_r}:${ramdisk_size} ${fdt_addr_r}
Which overwrites the NuttX Image in RAM. Here’s the Correct U-Boot Command…